Are you ready to connect your MetaMask wallet with the Arbitrum blockchain? If you are a cryptocurrency enthusiast who wants to explore more options, adding Arbitrum network to MetaMask is a great way of expanding your horizons and engaging in the fantastic opportunities on the network. In this guide, we’ll walk you through step-by-step instructions on how to add Arbitrum to MetaMask so that you can tap into new crypto assets.
Can I Add Arbitrum to Metamask?
Yes, adding Arbitrum Network to MetaMask is not only possible, but it’s also easy. To facilitate the connection, you will need to use a Remote Procedure Call (RPC). RPCs are protocols that allow one computer or system to request and run a program from another remote computer or system.
In Arbitrum’s case, an RPC enables the blockchain to connect to MetaMask’s wallet infrastructure. As a result of the connection, MetaMask wallet features become available to Arbitrum chain users.
Besides MetaMask, there are a variety of DeFi wallets that support the layer 2 network because it enables users to transact faster and more efficiently. These include Trust Wallet, Coinbase Wallet, Zapper Wallet, Uniswap Wallet, and SushiSwap Wallet.
How to Add Arbitrum to Metamask Manually Through RPC Details
Having the Arbitrum layer 2 protocol in your MetaMask wallet is simple. The process follows three key steps: creating a MetaMask wallet account, adding Arbitrum network to MetaMask, and finally, adding Arbitrum tokens to MetaMask. Here’s a breakdown of what each step entails.
Step 1: Create a MetaMask Account
Adding Arbitrum network to MetaMask is not possible without a MetaMask wallet account. Here’s a step-by-step guide on how to create a MetaMask account.
- Go to MetaMask’s official website and click the Download for Chrome button to download the MetaMask browser extension.
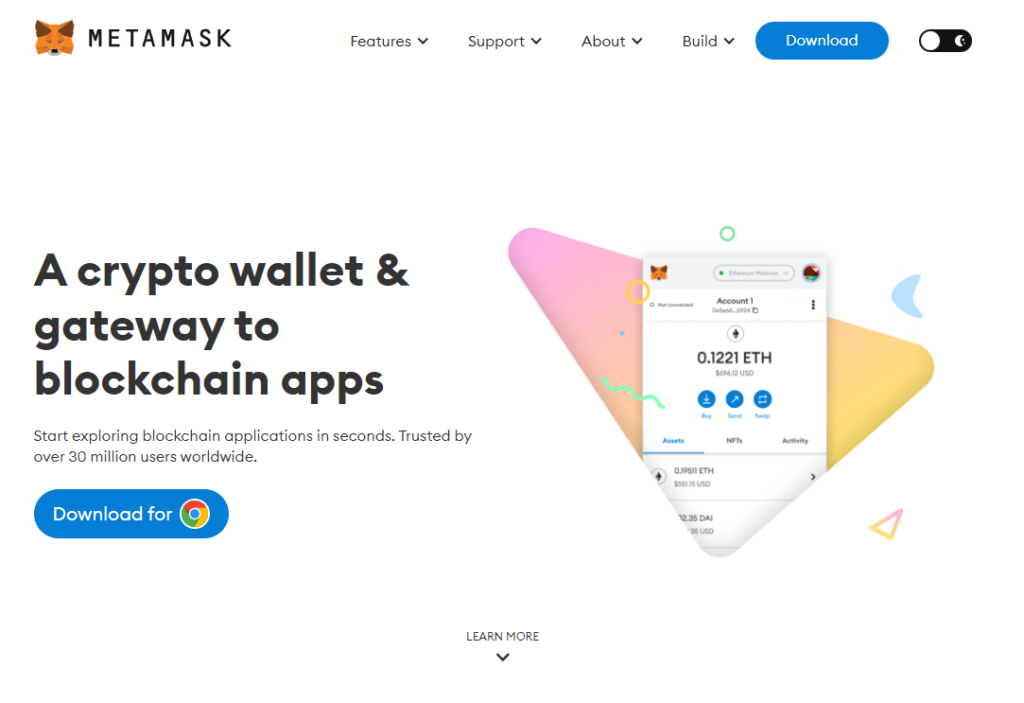
- When the download is complete, click your browser’s Extension icon.
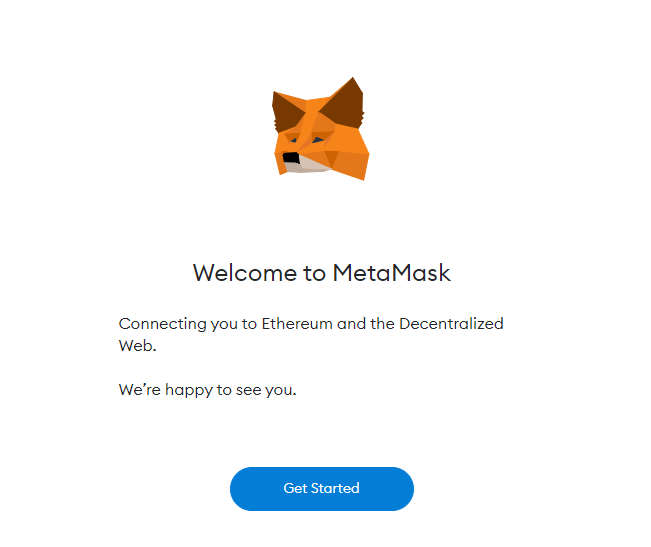
- Select the MetaMask wallet extension and tap on the Get Started button to access MetaMask.
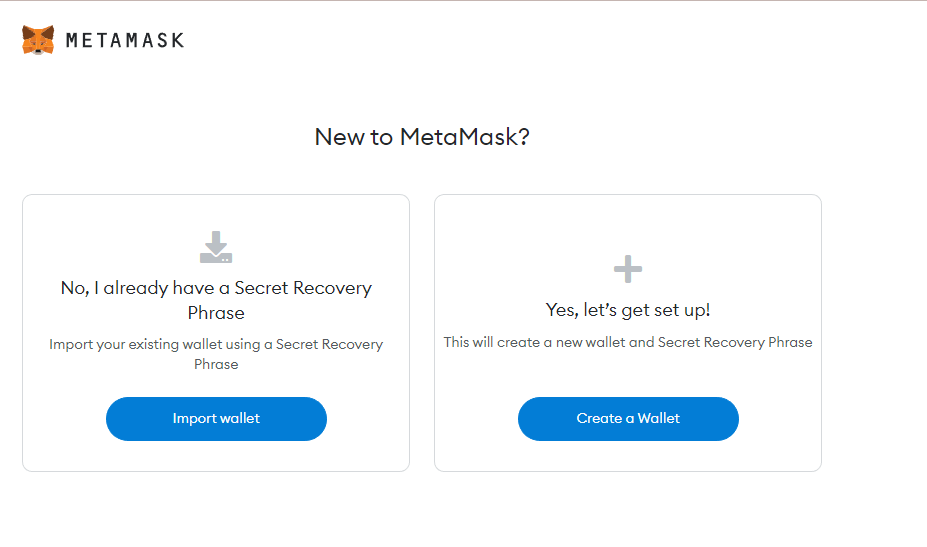
- On the tab that opens, you will see two options: Import Your Wallet or Create a Wallet. Choose the Create a Wallet option.
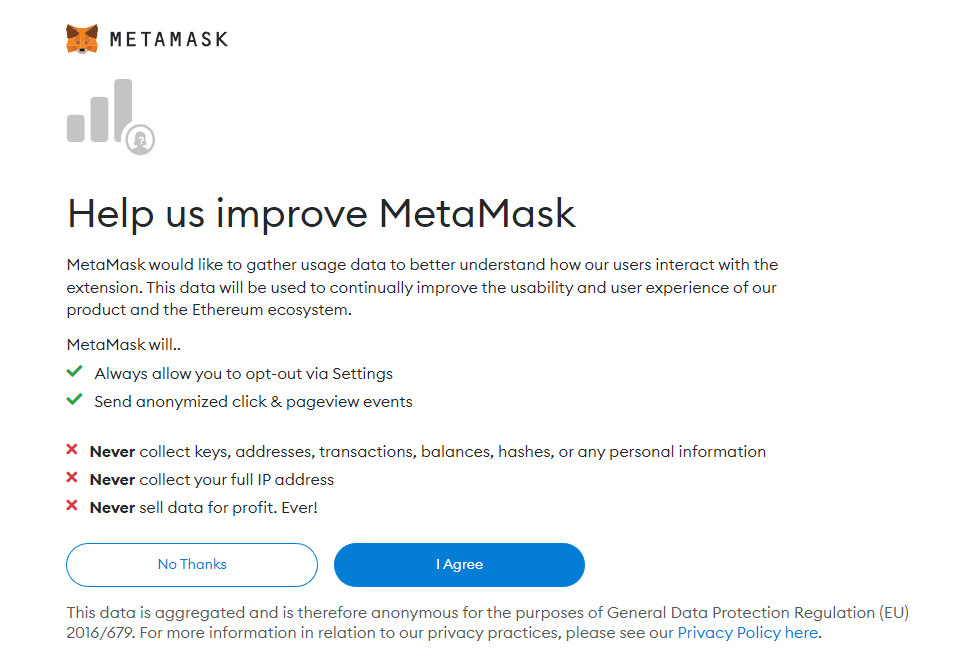
- Read and agree to MetaMask’s terms and conditions by clicking the I Agree button.
- Input a password in the password field and click Create to submit your responses.
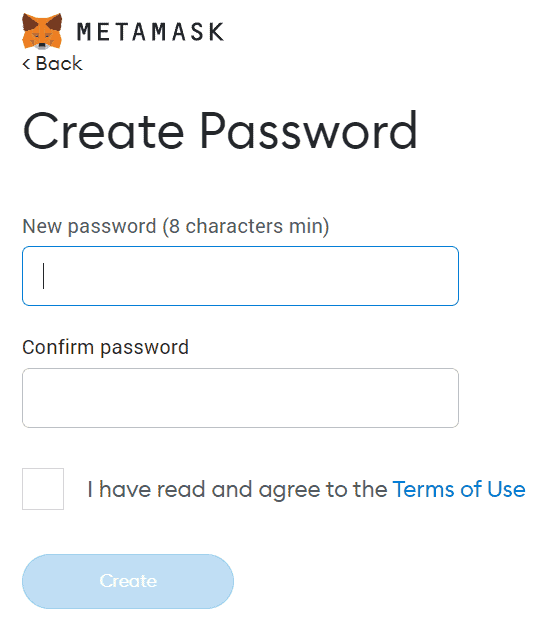
Once complete, you will receive MetaMask’s 12-word recovery phrase. This is the seed phrase you use to regain access to your MetaMask wallet if you forget your password or lose access. Always store your seed phrase somewhere secret and never share it with third parties to prevent hacking attempts on your account or tampering with your assets.
Step 2: Add Arbitrum Network to Your MetaMask Account
After successfully creating a MetaMask wallet account, the next step is to link your Arbitrum account to the crypto wallet. Here’s a step-by-step guide on how to achieve that.
- Open MetaMask and click the dropdown menu, then select the Add network button.
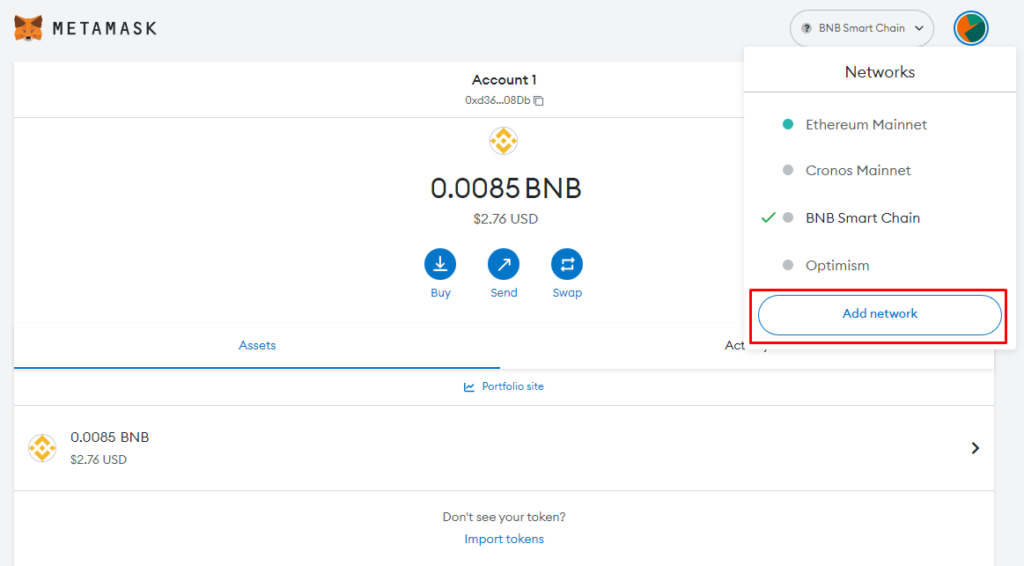
- Scroll to the bottom of the page that opens and click Add a network manually text.
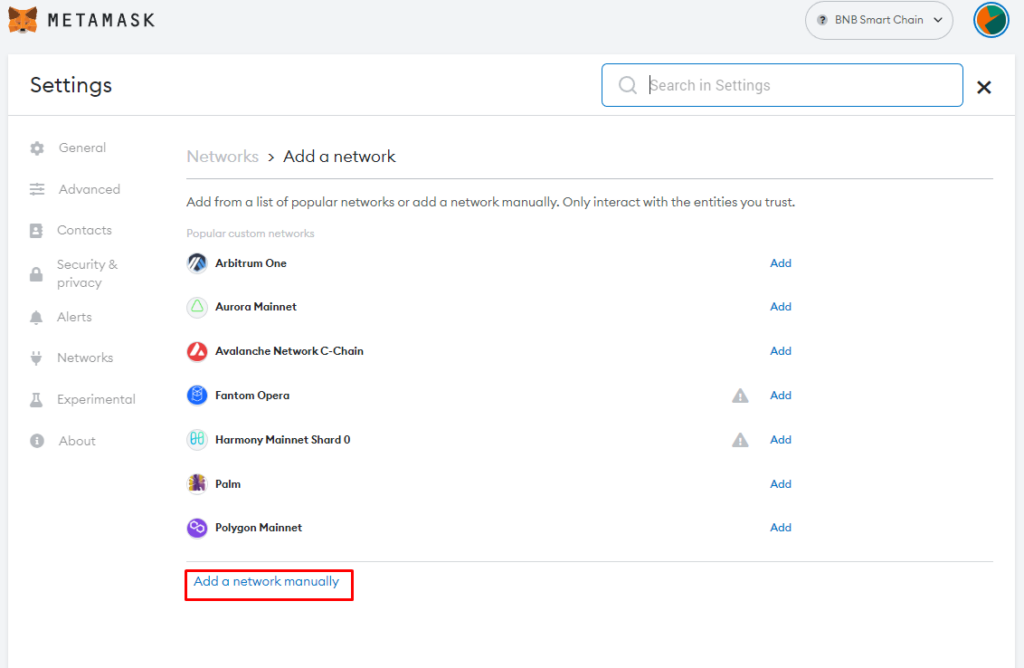
- Enter the blockchain information, including the network name, RPC URL and the details listed below, into the respective fields and click Save to add Arbitrum mainnet to Metamask.
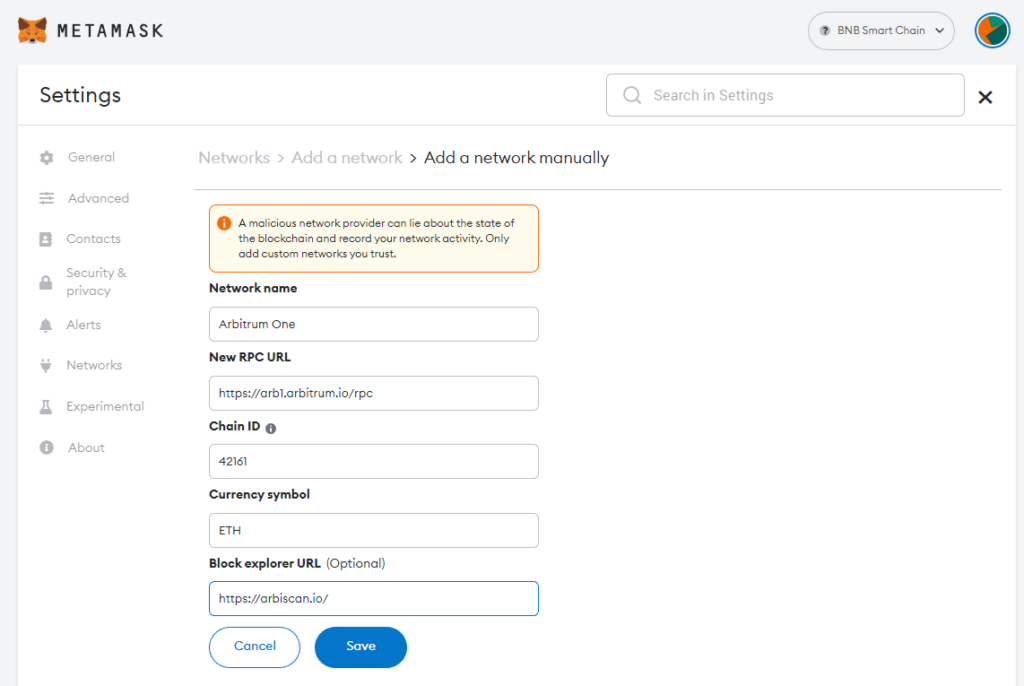
Network Name: Arbitrum One
New RPC URL: https://arb1.arbitrum.io/rpc
Chain ID: 42161
Symbol: ETH
Block Explorer URL: https://arbiscan.io/
- If your connection is successful, you’ll be redirected to your MetaMask dashboard, and this time the network name will read Arbitrum One.
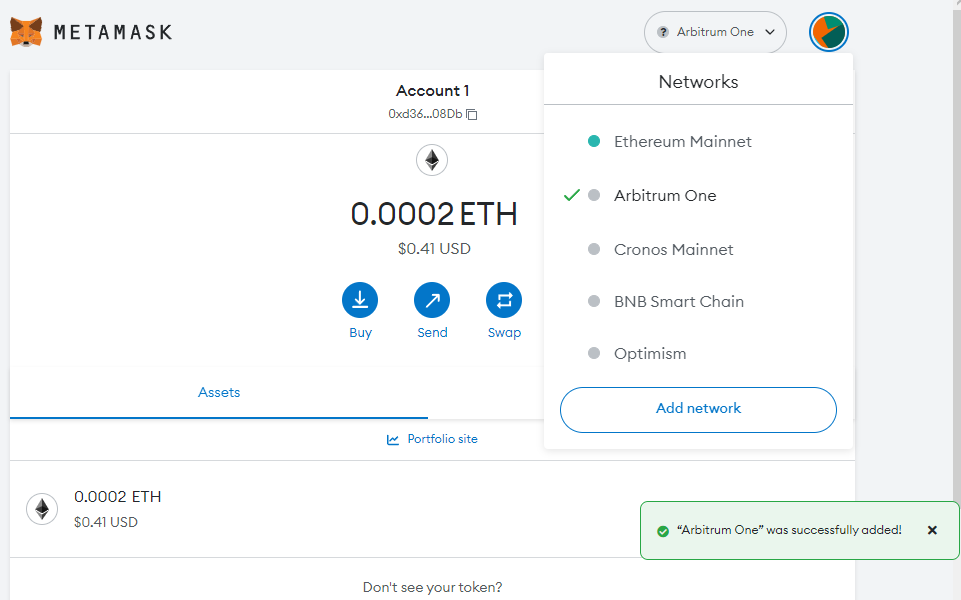
Step 3: Add Arbitrum tokens to Your MetaMask Account
Adding the Arbitrum network to MetaMask wallet doesn’t automatically import tokens onto the network. You can receive the tokens, but they will not appear natively on your dashboard. To get them to appear, you need to add the Arbitrum tokens manually. Use the Arbitrum token importation instructions below to help you achieve this.
- Log in to your MetaMask wallet, and ensure your account is set to Arbitrum One.
- Scroll to the bottom of the MetaMask dashboard and click Import tokens.
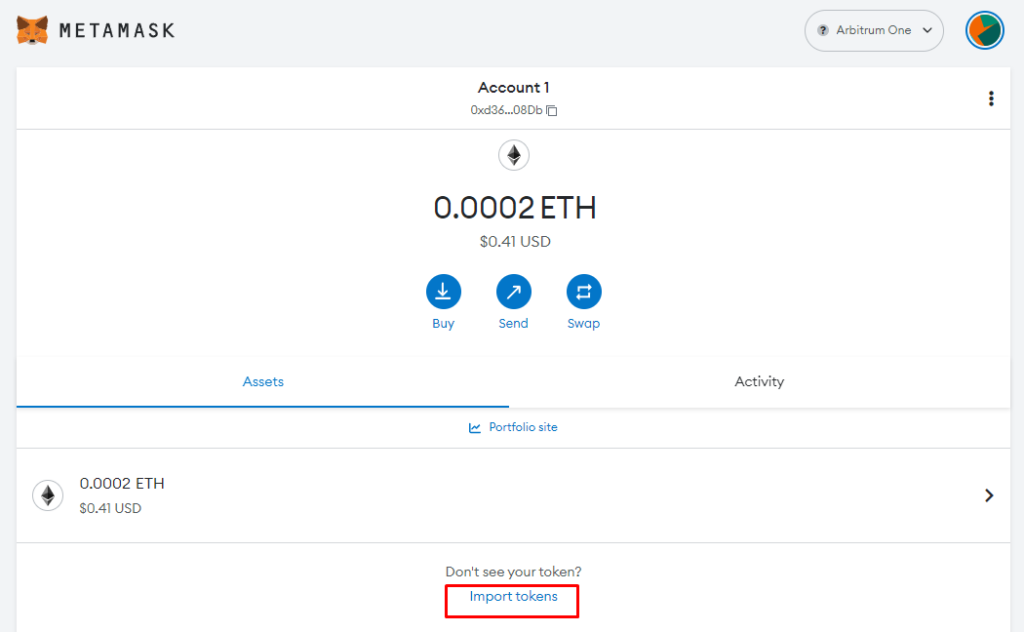
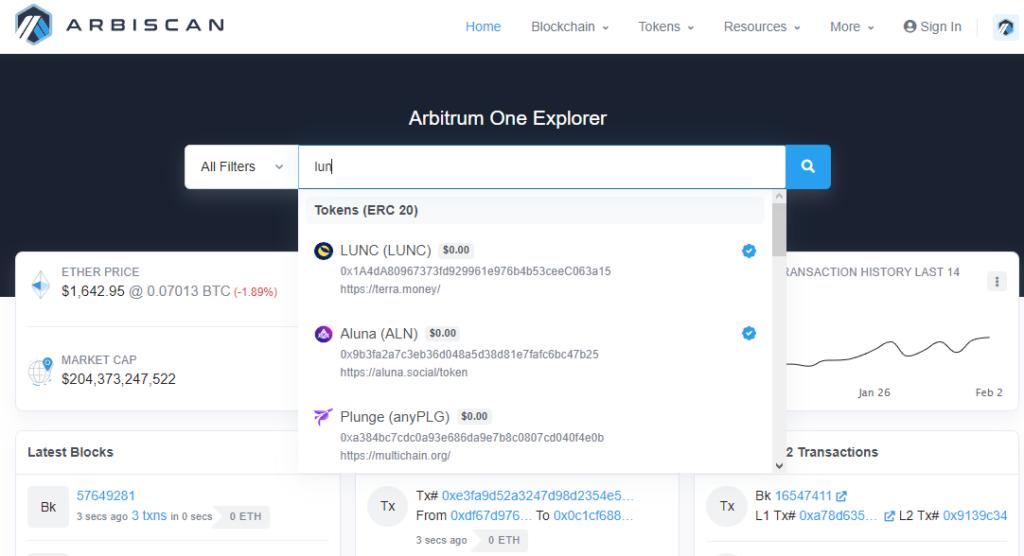
- Go to Arbiscan and get the contract address for the coin you want to add.
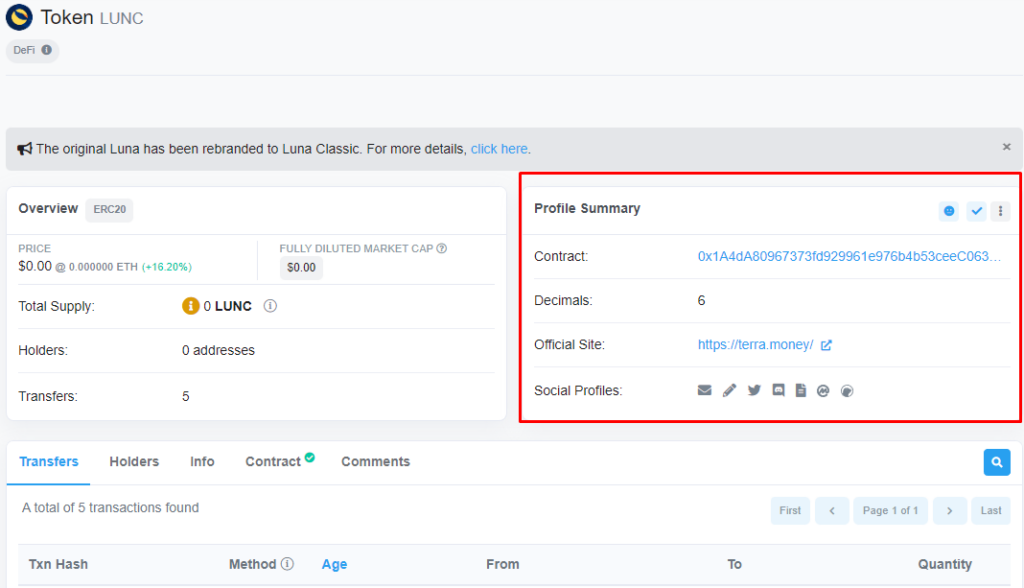
- You will find the address under the Profile Summary section.
- Copy this address and paste it into the Token Contact Address field under the Custom Token section in Metamask. If the address is correct, it should auto-generate the details of the other fields. Once you have the correct details, click Add Custom Token.
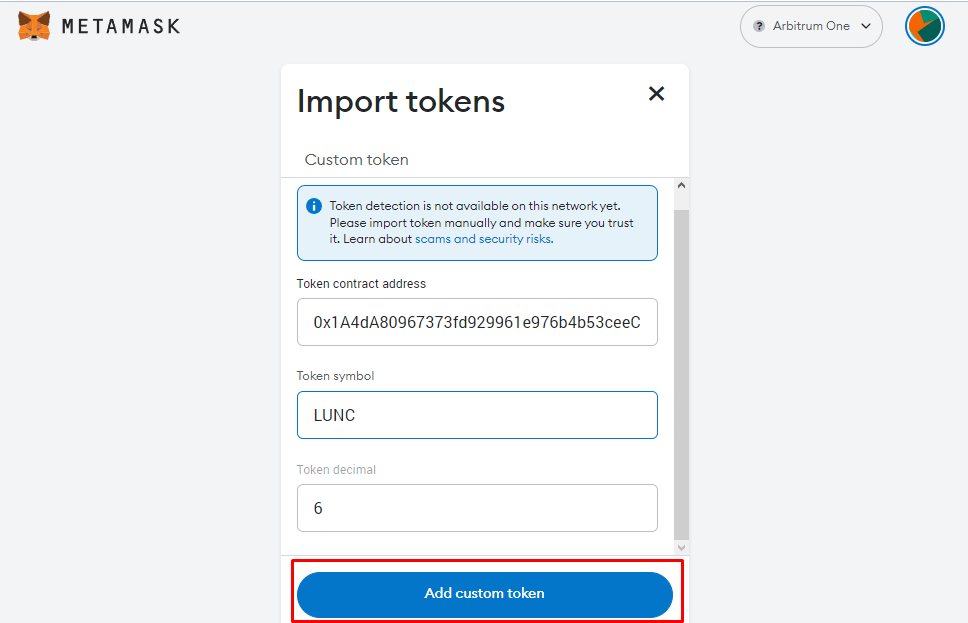
- This redirects you to the Import Token tab. Click Import Token on this tab to initiate the importing process.
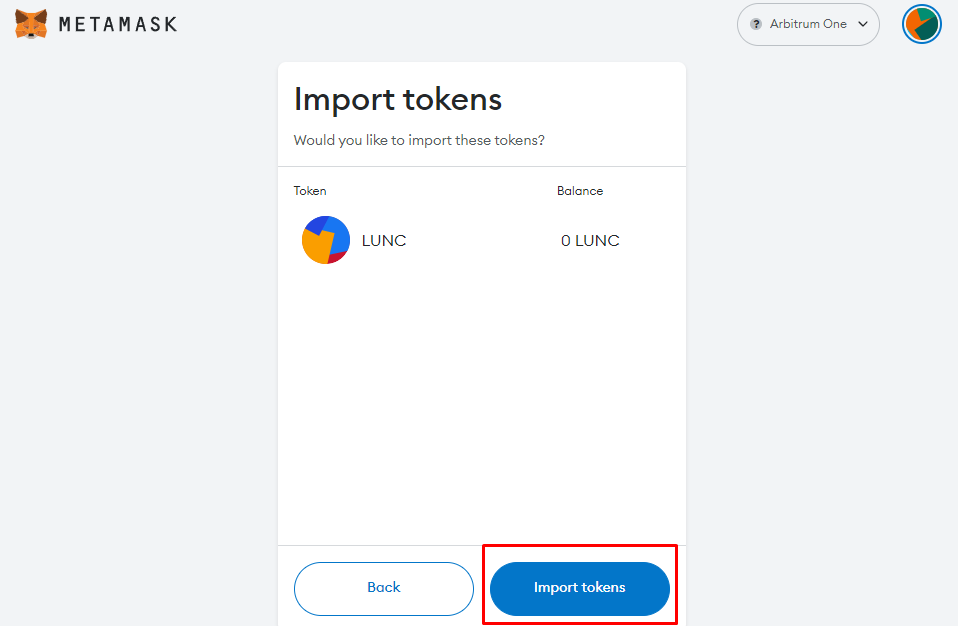
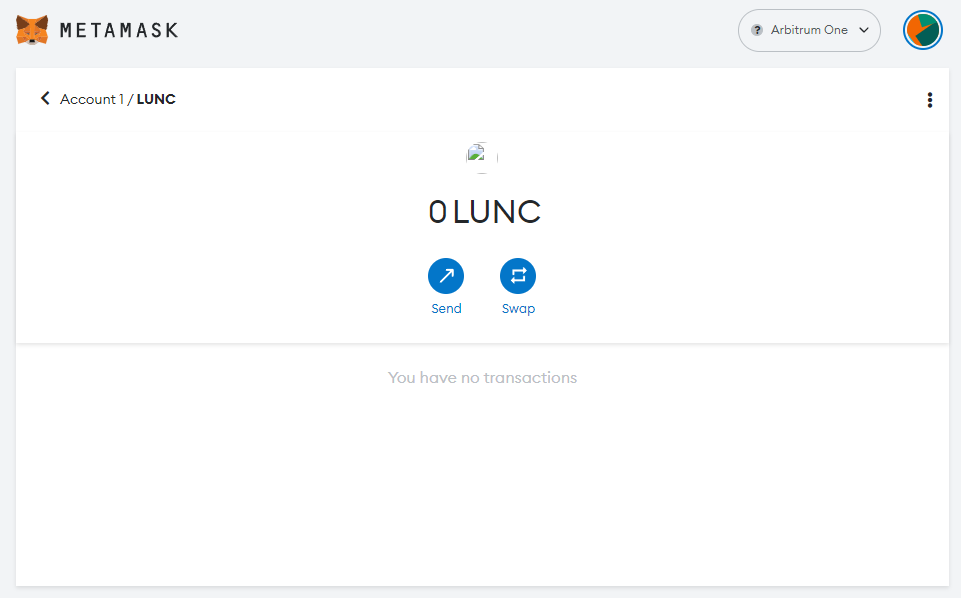
- If you import the token successfully, the MetaMask dashboard will pop up, and the token indicated will be the one you just imported.
How to Add Arbitrum Nova to Metamask through RPC Details
The Arbitrum Network has another chain besides Arbitrum One. This new chain is called Arbitrum Nova. Arbitrum Nova differs from Arbitrum by virtue of data storage. While Arbitrum One stores transaction data on-chain, Nova sends it to a Data Availability Committee (DAC).
Adding Arbitrum Nova to MetaMask follows the same steps as adding Arbitrum One to MetaMask. However, when you get to the custom RPC details section, you need to enter Arbitrum Nova’s details as listed below.
Network Name: Arbitrum Nova
New RPC URL: https://nova.arbitrum.io/rpc
Chain ID: 42170
Symbol: ETH
Block Explorer URL: https://nova.arbiscan.io/
How to use the Arbitrum Bridge
The Arbitrum Bridge is designed to facilitate asset transfers between the Ethereum mainnet and the Arbitrum network. By using the bridge, you can seamlessly move assets back and forth between these two networks, gain access to decentralized apps on Arbitrum, and benefit from the scalability and cost-effectiveness of the Arbitrum network.
Here’s a detailed summary of how to use the Arbitrum Bridge.
- Go to your MetaMask wallet account and ensure the network is set to Ethereum Mainnet
- Login to Arbitrum Bridge using your MetaMask wallet.
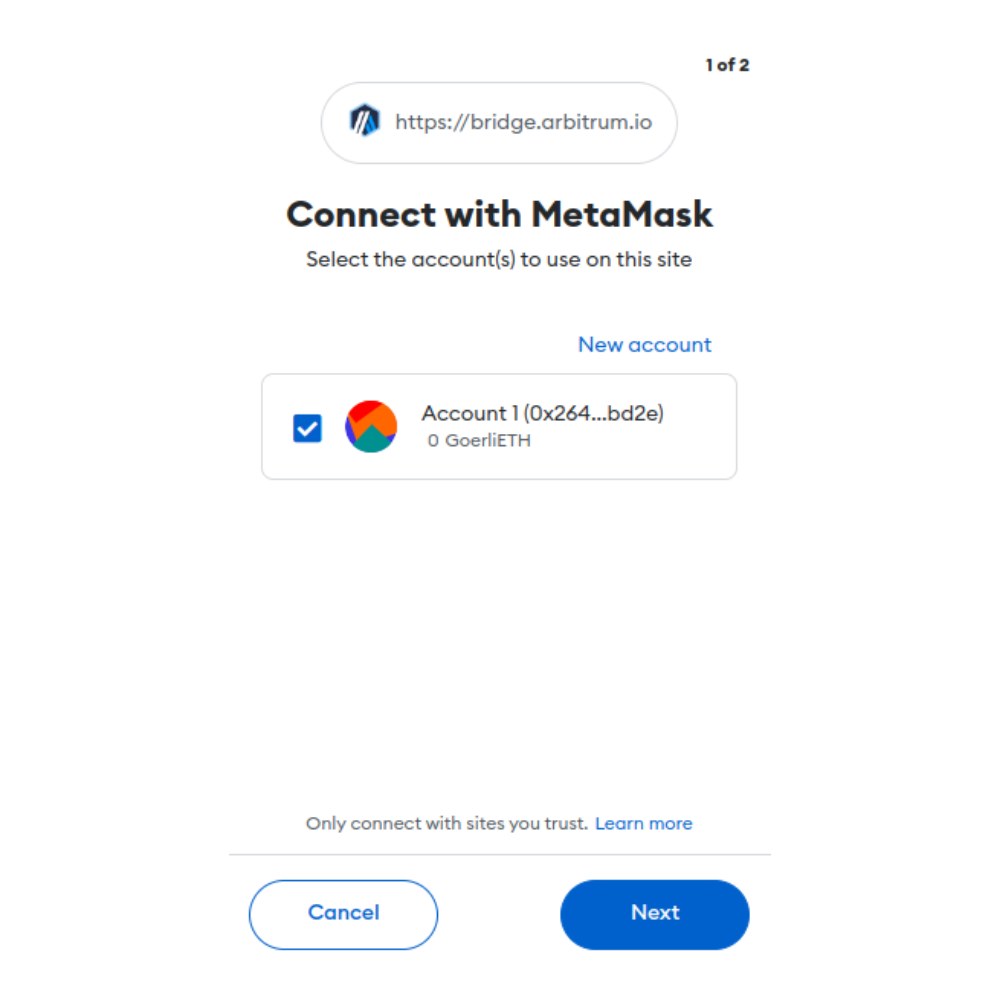
- Select the network you want to bridge between Arbitrum One and Arbitrum Nova.
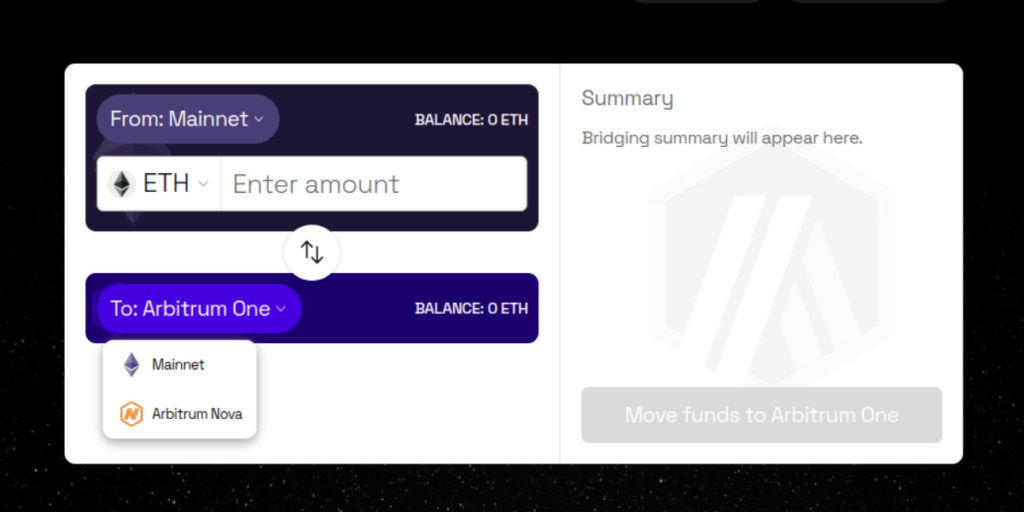
- Choose the token you want to bridge in the token drop-down menu. In this tutorial’s case, we chose ETH.
- Enter the amount of ETH/tokens you want to bridge and click the Move Funds to Arbitrum button on the right side of the screen.
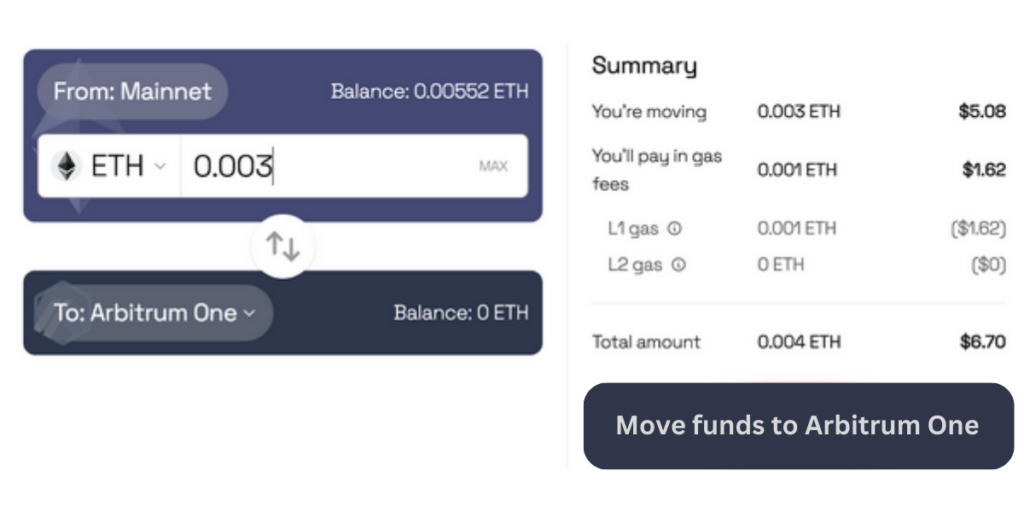
- Scroll down the MetaMask window that opens and click Confirm to complete the transaction.
Your funds will take about 10 minutes to successfully move to your selected Arbitrum network.
What Is Arbitrum?
Arbitrum is an optimistic rollup for the Ethereum blockchain. Optimistic transaction rollups are protocols built on the Ethereum network, providing layer 2 scaling solutions to the blockchain’s services.
In Arbitrum’s case, the protocol facilitates rapid communication between Ethereum smart contracts and EVM networks. Rather than tasking the Ethereum mainnet to verify every contract, Arbitrum independently processes transactions and only sends feedback to the mainnet for recording purposes.
With such efficiency and speed, Arbitrum is a convenient add-on to any Ethereum crypto wallet. The layer 2 solution increases users’ transaction speeds and reduces gas fees and transaction costs on the Ethereum mainnet.
FAQs
How do I manually add Arbitrum One to MetaMask?
You can effortlessly add the Arbitrum network to MetaMask. All you need to do to achieve this is create a MetaMask wallet account and log in to it. Once logged in, navigate to the Add Network section in MetaMask and opt to Add Custom Network. On the next tab, enter the RPC details associated with Arbitrum One and click Save to complete the process.
What is the RPC URL for Arbitrum?
Arbitrum has two main chains you can add to digital wallets like MetaMask using RPC details. The first chain is Arbitrum One, whose RPC URL is https://arb1.arbitrum.io/rpc. Then there’s Arbitrum Nova, a more secure version of Arbitrum One. Arbitrum Nova’s RPC URL is https://nova.arbitrum.io/rpc.
Is Arbitrum the same as Arbitrum One?
No. Arbitrum network is an ecosystem, while Arbitrum one is an Arbitrum Mainnet. This means Arbitrum One is a part of the Arbitrum ecosystem. Another part of the Arbitrum layer 2 network is Arbitrum Nova, a security-optimized mainnet.
How do I add a token to Arbitrum?
To add tokens to Arbitrum, you need to import them. Typically, this requires users to log in to their MetaMask wallet accounts and set the network to Arbitrum One. After doing this, scroll to the bottom and click Import Tokens.
Once this is done, navigate to Arbiscan and get the contract address for the coin you want to add. You will find the address under the Profile Summary section.
Copy this address and paste it into the Token Contact Address field under the Custom Token section in Metamask. If the address is correct, it should auto-generate the details of the other fields. Once you have the correct details, click Add Custom Token. This redirects you to the Import Token tab.
Click Import Token on this tab to initiate the importing process. If you import the token successfully, the MetaMask dashboard will pop up, and the token indicated will be the one you just imported.



![Ledger vs Trezor: Which One Should You Use? (Updated [currentyear]) 59 Ledger Vs Trezor Featured Image](https://coinwire.com/wp-content/uploads/2023/03/ledger-vs-trezor-featured-image-1024x683.png)
![Swyftx vs CoinSpot ([currentyear]): Fees, Security and Supported Coins 60 Swyftx Vs Coinspot Featured Image](https://coinwire.com/wp-content/uploads/2023/07/swyftx-vs-coinspot-featured-image-1024x683.jpg)