If you want to learn about blockchain and web3, you need a crypto wallet to connect to these DeFi platforms. Metamask is a famous and easy-to-use crypto wallet.
We will guide you on how to create a MetaMask wallet. You can use it to send and receive crypto assets, access DApps, and manage your NFTs.
How to Create a MetaMask Wallet: A Step-by-Step Guide
To create a MetaMask Wallet and perform crypto transactions, you need to follow these basic steps:
- Visit the MetaMask website and get the extension
- Add the extension to your browser (Chrome, Firefox, or Brave)
- Begin the setup process and create a wallet
- Set a strong password for your wallet
- Write down your Secret Recovery Phrase
- Confirm your Secret Recovery Phrase
- Access your wallet and explore its features
Step 1: Visit the MetaMask website and get the extension
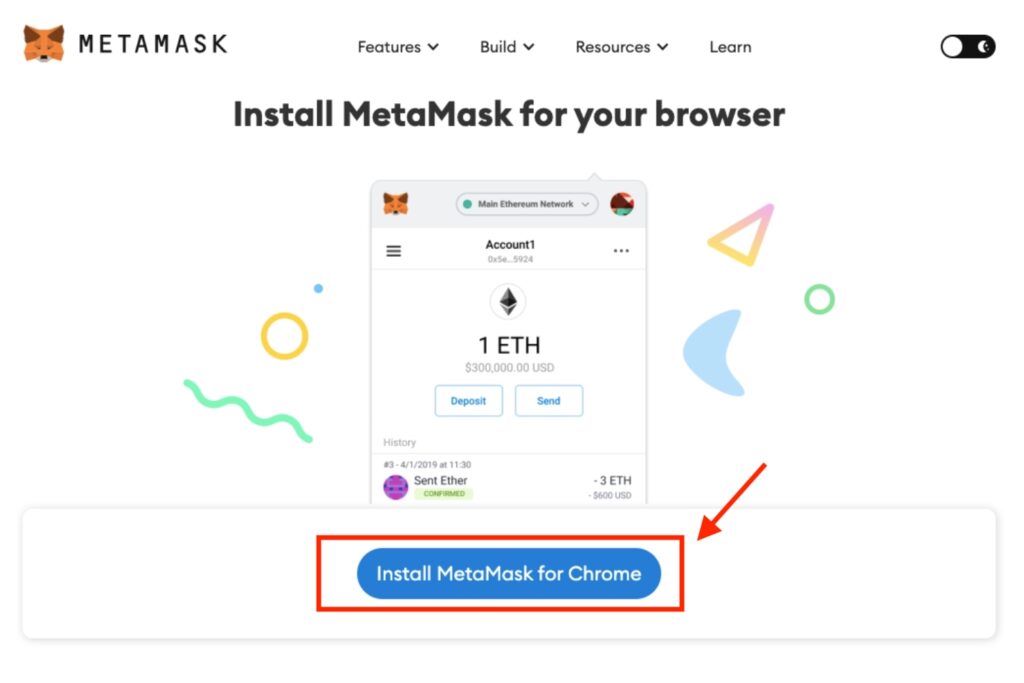
First, you need to go to the [MetaMask website] and click on “Download”. Then, choose “Install MetaMask for Chrome“. This will take you to the Chrome web store.
Step 2: Add the extension to your browser
Next, you need to click on “Add to Chrome” and then “Add Extension”. A new tab will open with the MetaMask logo and a welcome message.

Step 3: Begin the setup process and create a wallet
Now, you need to click on “Get Started” and then “Create a new wallet”. You can decide whether you want to agree to or decline the data-sharing settings.

Step 4: Set a password for your wallet
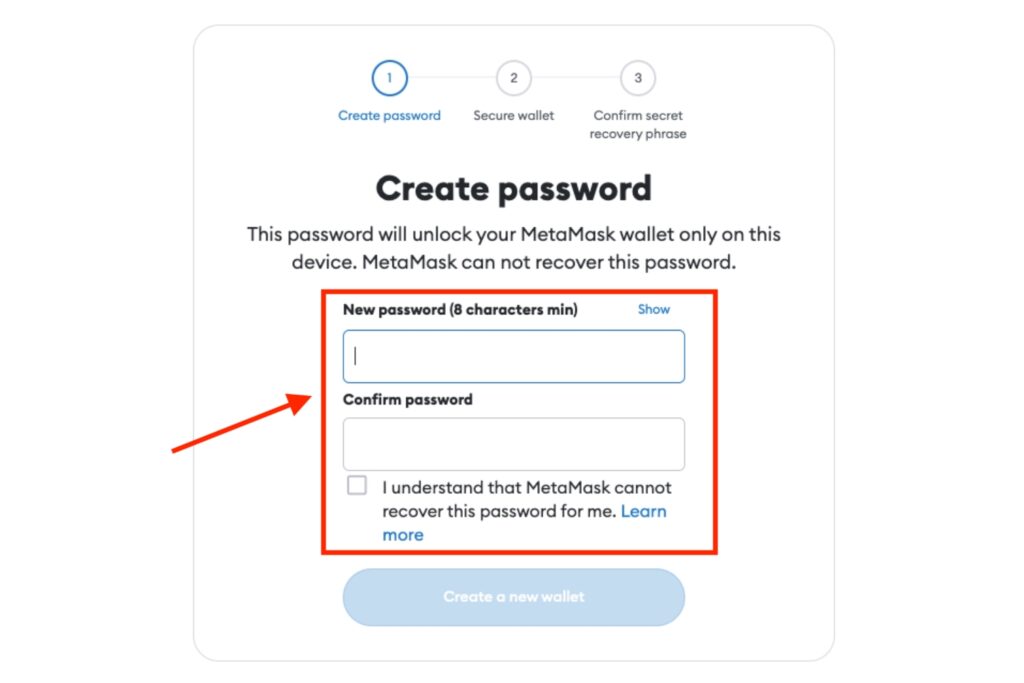
Then, you need to set a strong password for your wallet and click “Create”. This password will be used to unlock your wallet every time you use it.
Step 5: Write down your Secret Recovery Phrase
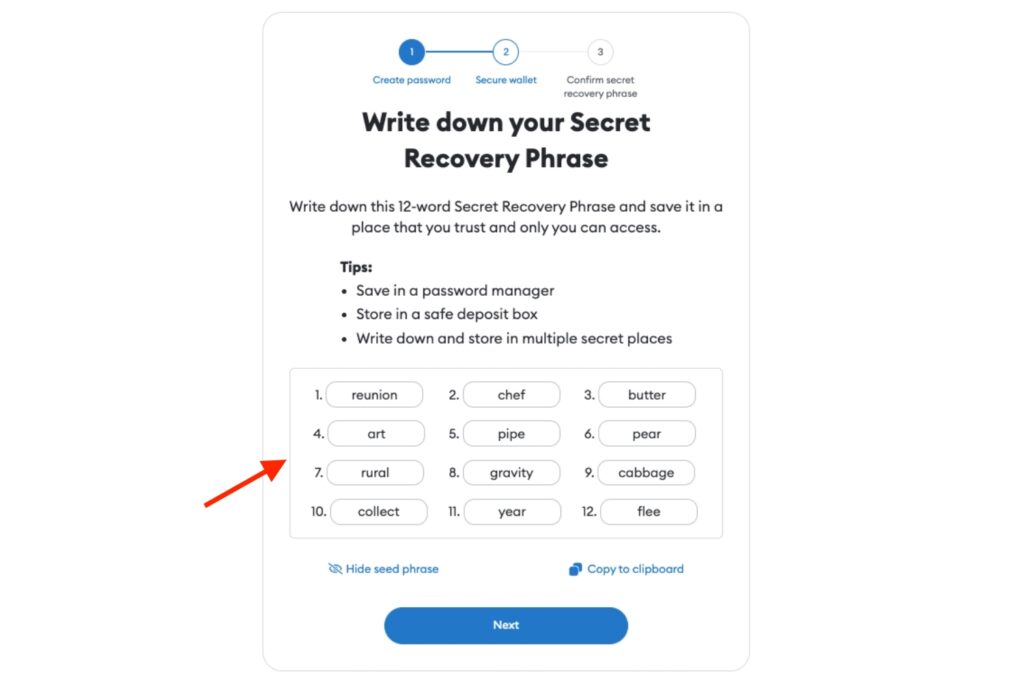
After that, you need to write down your Secret Recovery Phrase on a piece of paper and store it in a safe place. This phrase is the only way to restore your wallet if you lose access to it or forget your password. Do not share it with anyone or store it online.
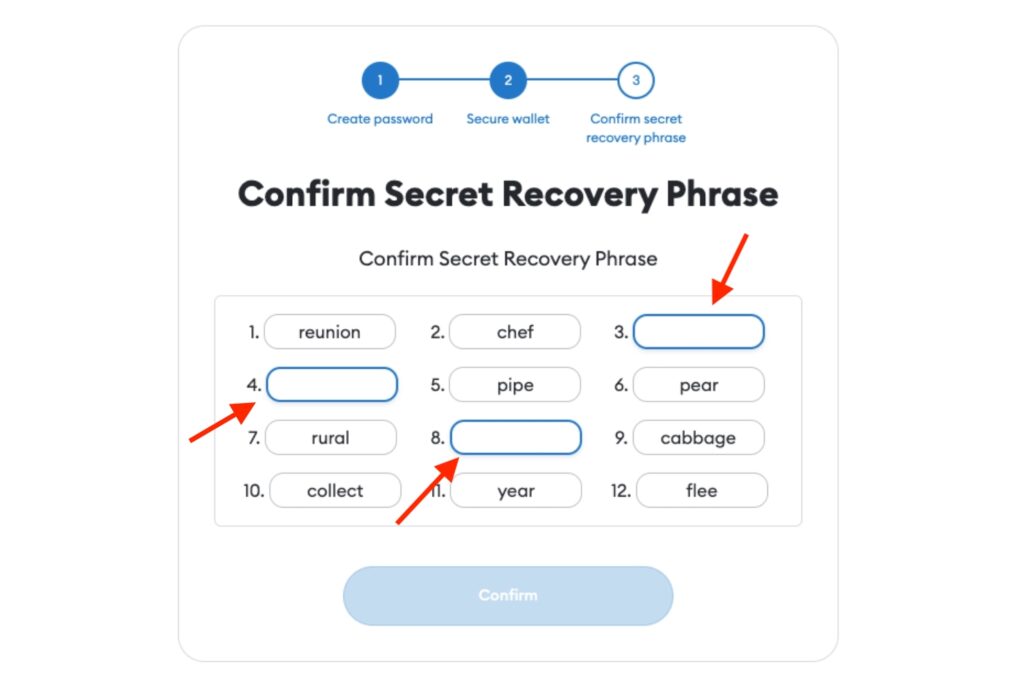
Step 6: Confirm your Secret Recovery Phrase
Next, you need to confirm your Secret Recovery Phrase by clicking on the words in the correct order. Then click “Confirm”.
Step 7: Access your wallet and explore its features
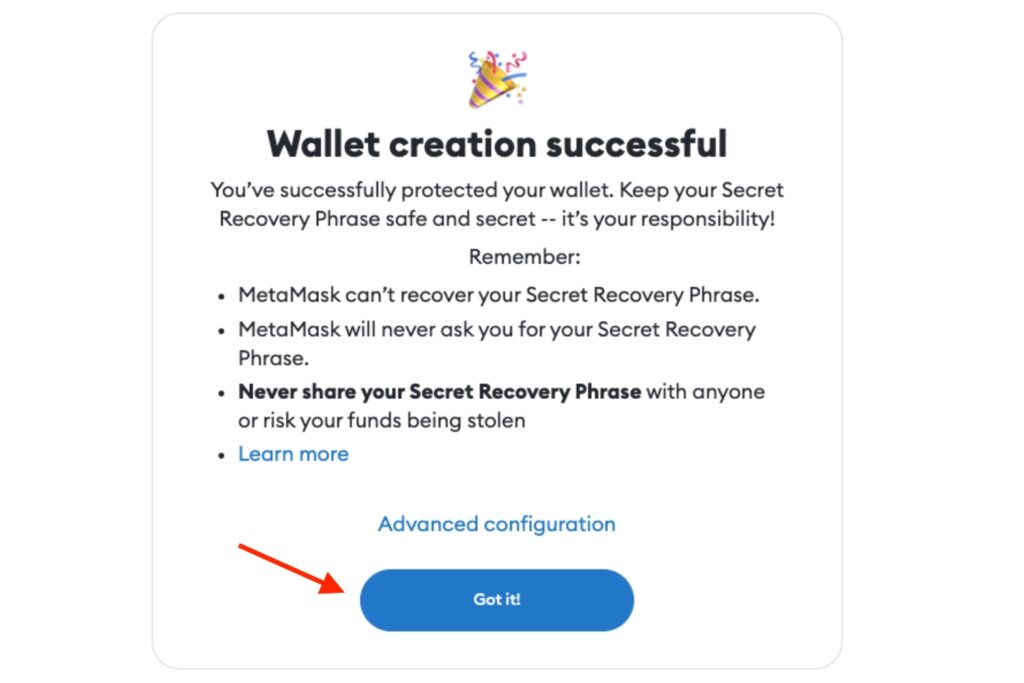
Congratulations, you have created your MetaMask Wallet! You can now see your account address, balance, and transaction history. You can also send and receive Ether and other tokens, swap tokens, and use it as a DeFi wallet to explore dApps. You can change your network, account name, security settings, and more.
How to Send or Receive Crypto in MetaMask?
Step 1: Open your MetaMask wallet
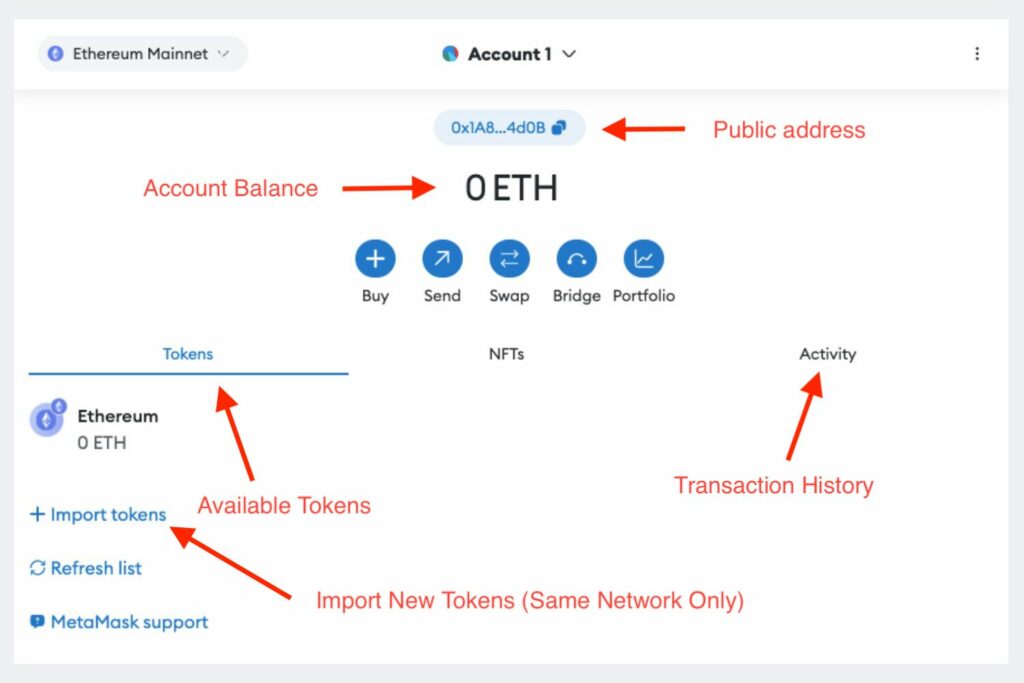
Once you have it, open it and enter your password to unlock your wallet. You will see your account address, balance, and transaction history in the “Activity” tab.
Simply select the “Tokens” section to view the cryptocurrencies you possess in your wallet. Additionally, you have the option to include custom tokens by selecting the “Import Tokens” button and providing the token’s contract address, symbol, and decimals.
Step 2: Send crypto from your wallet
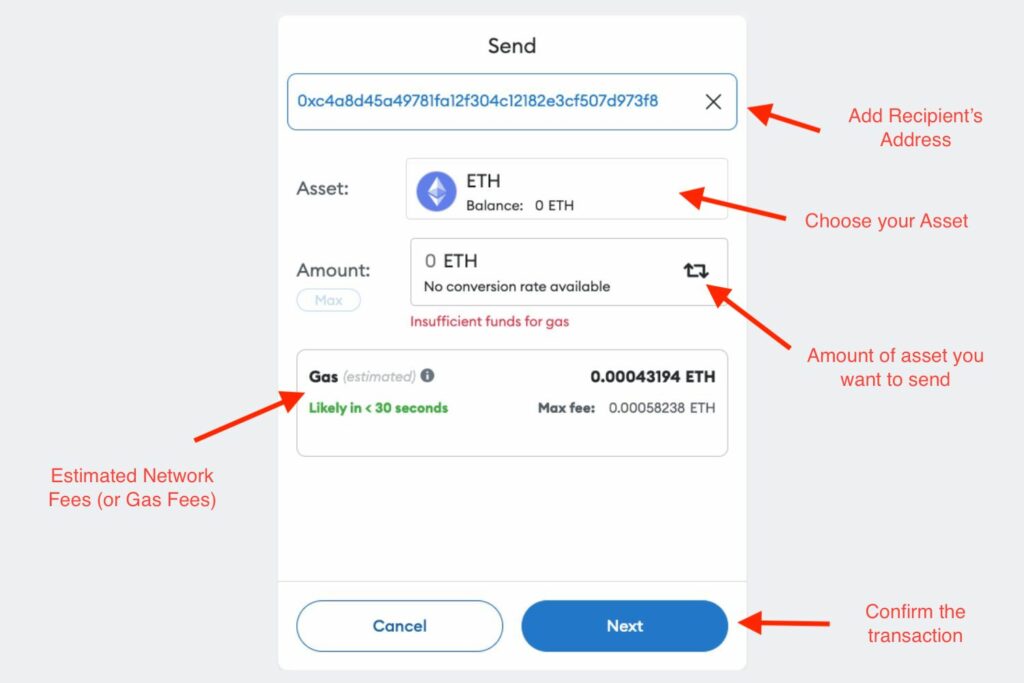
- Select the cryptocurrency you wish to send and locate the “Send” button.
- Input the recipient’s address or choose it from your address book.
- Enter the desired amount of cryptocurrency you want to send.
- You will be provided with an estimated gas fee for the transaction. You have the option to modify this fee by selecting “Edit.”
- The gas fee represents the network charge that can be paid in ETH or the specific token of the network you are using, such as BNB or MATIC.
- Take a moment to carefully review the transaction details and then click “Next” to finalize the process.
- Keep track of the transaction’s progress by checking the activity tab.
Pro Tip 💡: Take advantage of MetaMask’s “Advanced Gas Controls”: It lets you adjust the gas price for transactions. Enabling this feature gives you more control over gas fees, protecting you from excessive fees during busy network times or when dealing with potentially risky contracts.
Step 3: Receive crypto in your wallet
In order to get cryptocurrency in your wallet, you have to provide the person sending it to you with your public address. You can easily copy your address by clicking on it or hovering over your account name and selecting “Copy to clipboard”.
Then, you can paste your address into the sender’s application or share it with them. The sender will proceed to send the cryptocurrency to your address. If the token is not already in your MetaMask wallet, you might have to add it.
After the transaction is confirmed, you will be able to see the new amount of cryptocurrency in your assets tab.

How to add Custome Networks to MetaMask?
Step 1: Launch MetaMask on your browser and tap on the “Ethereum Mainnet” button on the top left. Tap on “Add Network”.
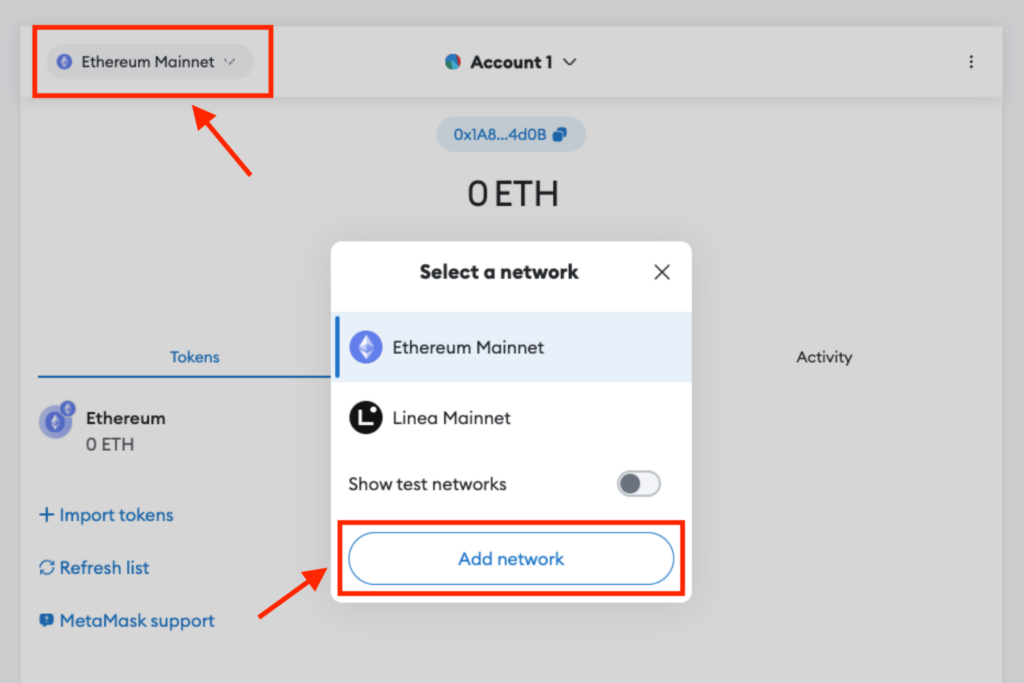
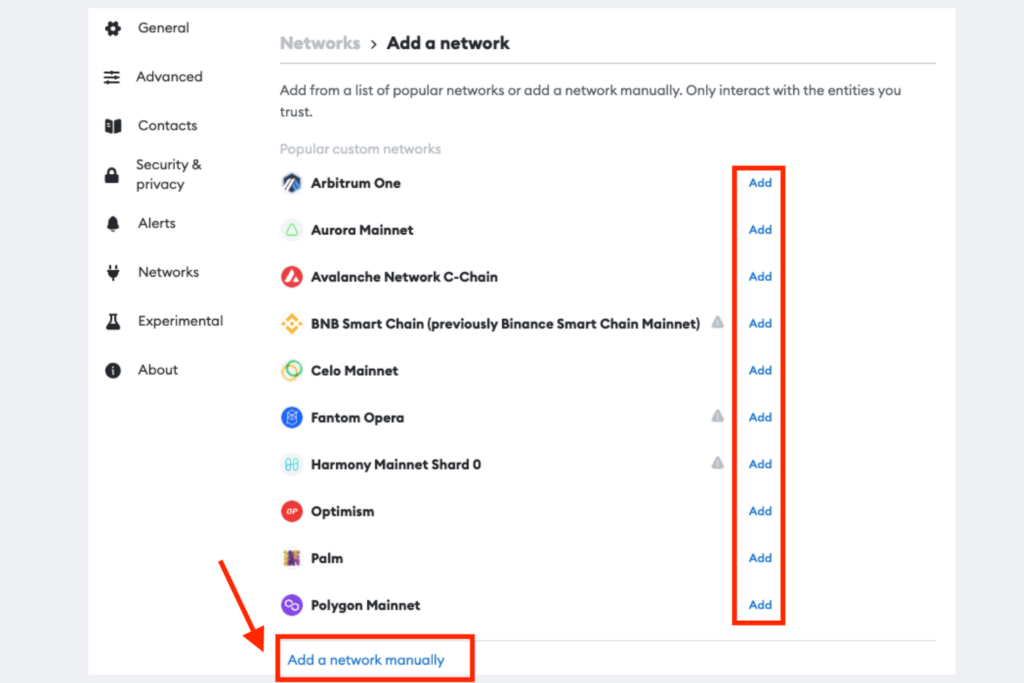
Step 2: You will see some popular networks that you can easily add, like BNB Smart Chain, Polygon, Avalanche, and so on. If you find the network you want, tap on Add and follow the instructions. If the network you want is not there, tap on “Add a network manually” at the bottom of the network list.
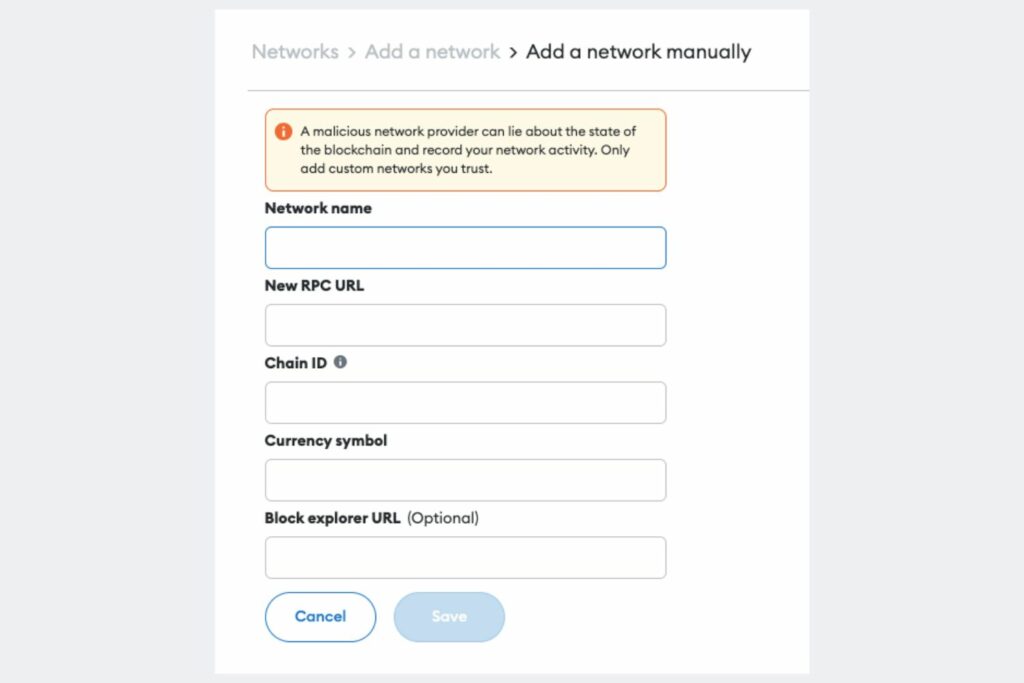
Step 3: You will need to enter some details about the network: Network Name, New RPC URL, Chain ID, Symbol, and Block Explorer URL (optional). You can find the network details on their official sites or docs. After entering the details, tap on Save to add the network.
What is MetaMask Wallet?
MetaMask Wallet is a cryptocurrency wallet that helps you control your Ethereum private keys and engage with decentralized applications (dapps) through your web browser or mobile device. It is trusted by more than 30 million users worldwide.
Unlike certain other wallets, it doesn’t store any personal information about you. It doesn’t keep your email address, password, Secret Recovery Phrase, or any other private keys. You have complete control over your crypto-identity. You can also connect Ledger to MetaMask for extra security.
Additionally, it allows you to customize your privacy settings, select your preferred RPC provider, and connect with Layer 2 networks.
Pro Tip 💡: MetaMask is natively an ERC20 Wallet, but you can import a BNB chain contract address to make it a BEP20 Wallet. Similarly, you can import other networks like Aptos, Solana, Arbitrum, etc.
Conclusion
MetaMask is a secure crypto wallet. It helps you keep and control your Ethereum assets and interact with blockchain apps and web3.
We showed you how to make a MetaMask wallet and use it for different things like sending and receiving money. We also gave you tips to keep your wallet safe from hackers and scammers. If you have any questions or feedback, please feel free to leave a comment below.
FAQs
How do I switch between different networks on MetaMask?
You can change networks on MetaMask. To do this, click or tap the network name in the top right corner. A list of networks will appear, like Ethereum mainnet, testnets, and custom RPCs. Pick the network you want to connect to and confirm it.
Can I add custom tokens or NFTs to my MetaMask wallet?
Yes, you can add custom tokens to your MetaMask wallet. Just press the “Import Token” or “Add NFTs” button at the bottom of the app or extension.
Then, you have to type in some details: the contract address, token symbol, and decimal places of the token you want to add. You can get this information from the token or NFT website or marketplace.
Is it free to create a MetaMask wallet?
Creating a MetaMask wallet is totally free. You don’t have to pay anything to get, set up, or use it. But you have to pay gas fees when you do transactions or use smart contracts on the Ethereum network.
What do you need to create a MetaMask?
To make a MetaMask wallet, you need a device that can run the wallet, like a computer or a phone. You also need an internet connection and a browser that works with MetaMask, like Chrome, Firefox, Brave, Edge, or Opera.
You can also use the MetaMask mobile app for iOS and Android devices. Plus, you need a strong password and a seed phrase that are used to keep and recover your account.
Is MetaMask only for Ethereum?
MetaMask is not just for Ethereum. It also works with other networks that are similar to Ethereum, like Binance Smart Chain, Polygon, Avalanche, Optimism, Arbitrum, etc.
Read more: A beginner’s guide to buying BNB on MetaMask


![How to Mint NFT on Solana: Ultimate Guide for [currentyear] 41 How To Mint Nfton Solana Featured Image](https://coinwire.com/wp-content/uploads/2022/10/how-to-mint-NFT-on-Solana-1024x683.png)

![Binance Margin Quiz Answers (Updated in [currentmonth] [currentyear]) 49 Binance Margin Quiz Answers Featured Image](https://coinwire.com/wp-content/uploads/2023/01/binance-margin-quiz-answers-featured-image-1024x683.png)
![How to Buy Crypto Under 18 in [currentyear] with Minors 50 How To Buy Crypto Under 18 Featured Image](https://coinwire.com/wp-content/uploads/2023/10/how-to-buy-crypto-under-18-featured-image-1024x683.jpg)
